If you want to become a profitable trader, you only need to spend a few days finding a strategy that
will give you more wins and keep your losses to a minimum, and the Order Block candle is one of the few
strategies you need to learn about.
Even though a strategy is not the 100% thing you need to succeed in this field, it’s important to have
a solid strategy with rules that will enable you to engage the market at the right time and place.
For Smart Money Traders, the ICT Order Blocks are not a new thing, but the challenge comes when
you have to select an Order Block with more chance of respecting the price.
In this Institutional Tradable vs Non-Tradable Order Blocks article, I will guide you to understand a few tips on selecting a high-probability Order Block.
What are Order Blocks in Forex Trading?
Order Block (OB) is the last candle before the strong move that creates an imbalance in the
market and must be near or at the support or resistance level.
Types of Order Blocks
The two main types of Order Blocks include;
a) Bullish Institutional Order Block
The last candle before the strong move up creates a strong Bullish imbalance and must be
near or at the Support or Resistant.
b) Bearish Institutional Order Block
The last candle before the strong move down creates a strong Bearish imbalance and must
be near or at the Support or Resistant.
It is assumed that the OB candle is where the market makers will likely enter or exit their positions.
Therefore, the market makers buy or sell large orders at the OB to add liquidity, temporarily
clearing out excess orders from the inventory before the market resumes at an orderly level.
When they come back to the OB (during mitigation), it is when we engage them.
NOTE: It’s important to note that Order Blocks come in different shapes, including Engulfing, Pin
Bar and Double Maru, which I have explained in detail in the Advanced Institutional Order Block Trading book.
Order Blocks Trading: Essential Things to Understand
Mitigation means reducing risk.
Mitigation happens during retracement as a result of hedging.
When the market maker moves prices away from a level of strength and magnitude, leaving
behind an imbalance, it is assumed that they entice retail traders to join the move.
And because most retail traders are price chasers, they join the ride with their Stop Loses [SL]
set. As a result, the market makers will come back to clear those stops.
When the SL is hit, the retail traders are knocked out of the move, and the market will resume its
normal trend.
NOTE: Mitigation is not a must after an imbalance in the market because this will always
depend on how much profit the market maker has made.
During retracement (mitigation), we say the market is balancing (compressing)
When the market moves from a certain point aggressively, leaving behind an imbalance, we can
also, call this Liquidity Void.
The Zones created due to this and other price actions are called Demand and Supply Zones.

Features of High Probability Institutional Order Blocks
1. The Order Block should be at or near the support or resistant
Nothing turns off a Smart Money Trader like hearing about support and resistance.
However, if you think that these are just random lines on charts, then you might be getting it
wrong.
When there is a significant breakout of strong resistance, there is a high chance that the market
maker is inducing buyers before they sell.
If this happens at a higher time frame point of interest, such as the supply zone, we will prepare to
sell after the formation of the Bearish Order Block.
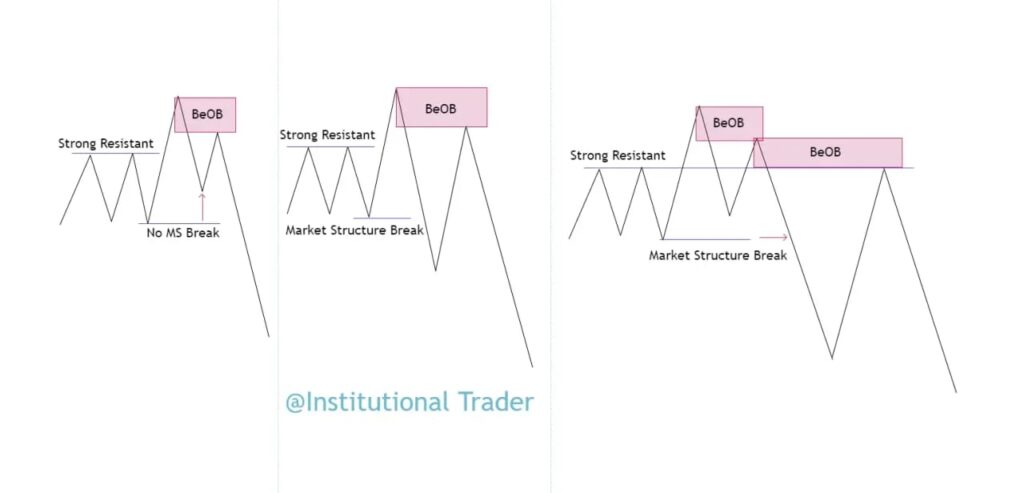
SOPs;
- A significant breakout of strong resistance before the formation of the Bearish OB.
- The price must be at Supply Zone (whether in reversal or continuation)


Similarly, when there is a significant breakout of strong support, there is a high chance that the market maker is inducing sellers before they buy.
If this happens at a higher time frame point of interest, such as the demand zone, we will prepare
to buy after the formation of the Bullish Order Block.
SOPs;
- A significant breakout of strong support before the formation of the Bullish OB.
- The price must be in the Demand Zone (whether in reversal or continuation).
Assignment; Share in the comment section below the charts for BuOB of the 3 examples given above.
2. Order Block should be at or near the Flip Zone
Flip Zone is when support becomes resistant or resistant becomes support.
This setup is highly probable if you spot it on a trend continuation.
So, how do you trade this setup?
1) One risky setup is to take a trade in the exact flip zone.
Check for Bullish Engulfing OB, DM, or a significant breakout (for hidden OBs) in the Flip Zone.
Here, in DM setup and significant breakouts (for hidden OBs) are highly probable if there is a
BREAKER BLOCK on your left.
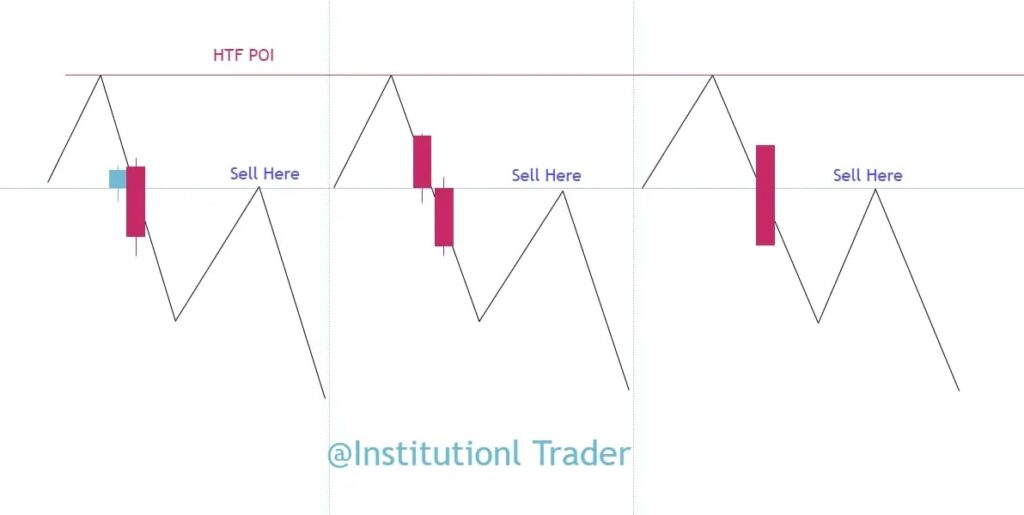

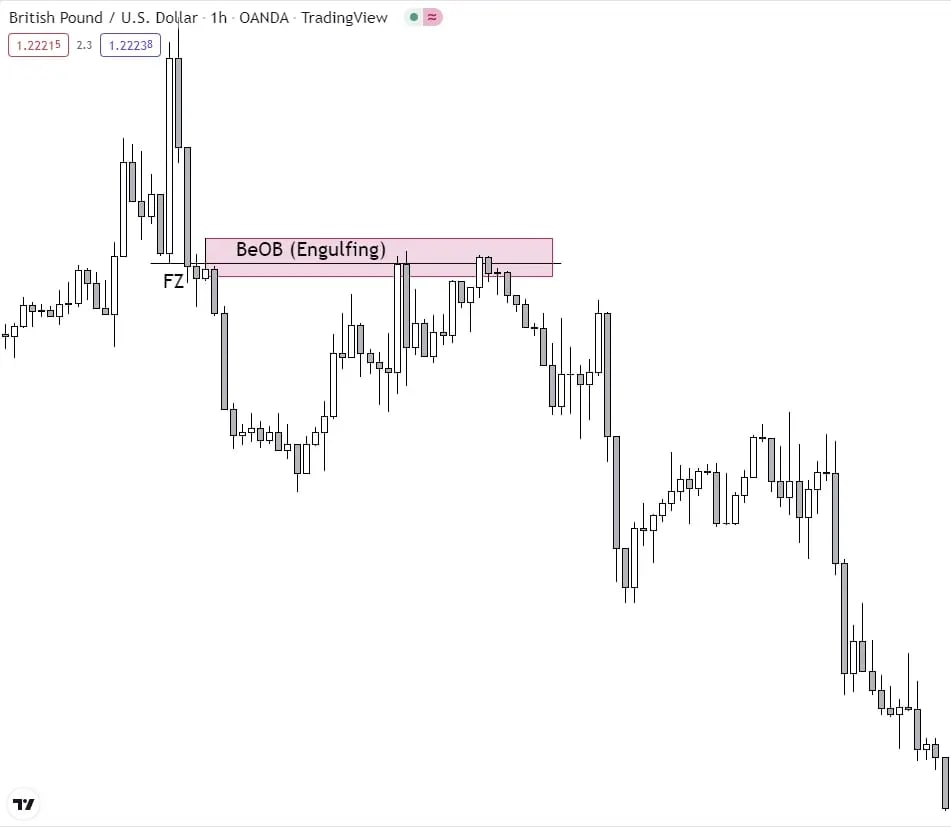
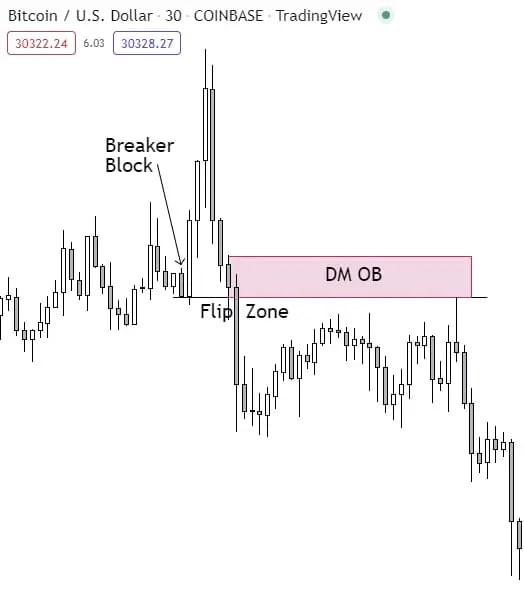
Assignment; Share in the comment section below the charts for BuOB of the 3 examples given above.
2) Another way to trade OBs near FZ is to wait for FZ formation.
This is the most effective and high-probability setup since we are following the footsteps of the big boys.
Therefore, we join the ride on FZ manipulation/breakout.

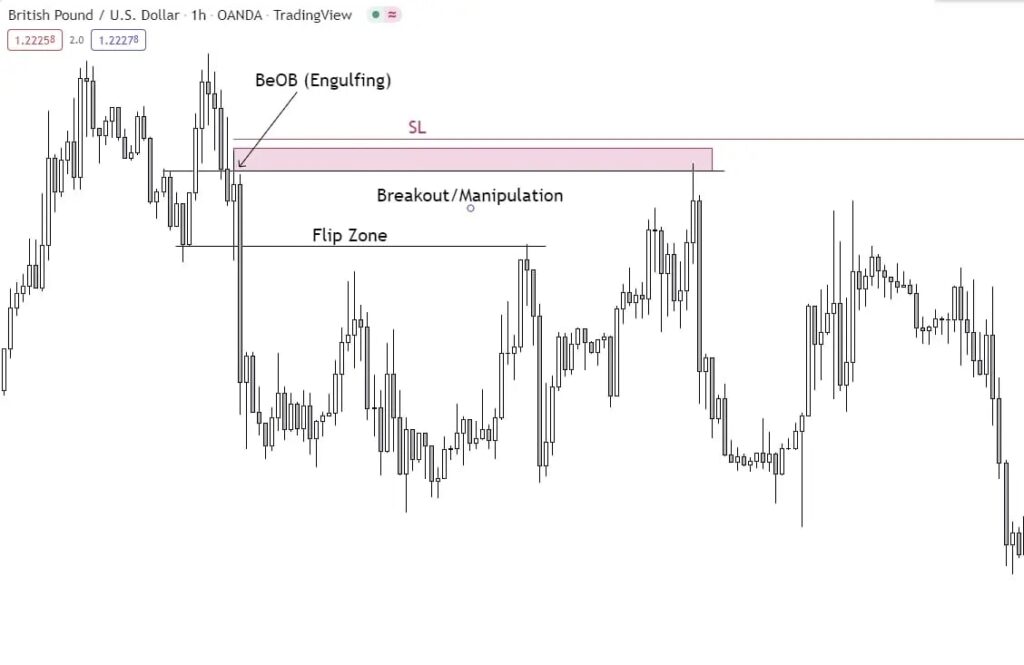
Assignment; Share in the comment section below the charts for BuOB of the example given above
3. Order Block should Break Market Structure after Liquidity Raid
This is commonly known as SH + BMS + RTO.
SH = Stops Hunt (Liquidity Raid.
BMS = Break of Market Structure (MS Break/Market Structure Break).
RTO = Return to OB/Origin.

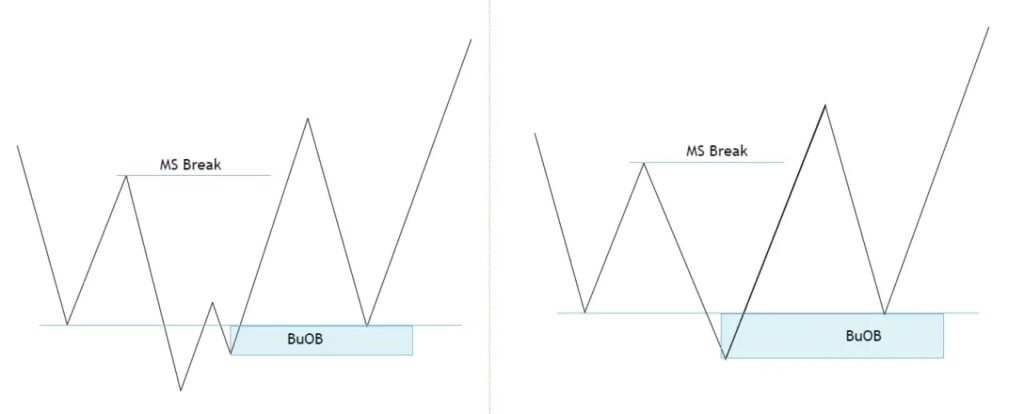

SOPs
- Liquidity Raid should happen inside HTF POI
Assignment; Share in the comment section below the charts for BuOB of the example given above.
4. Order Block should be at or near SSR level

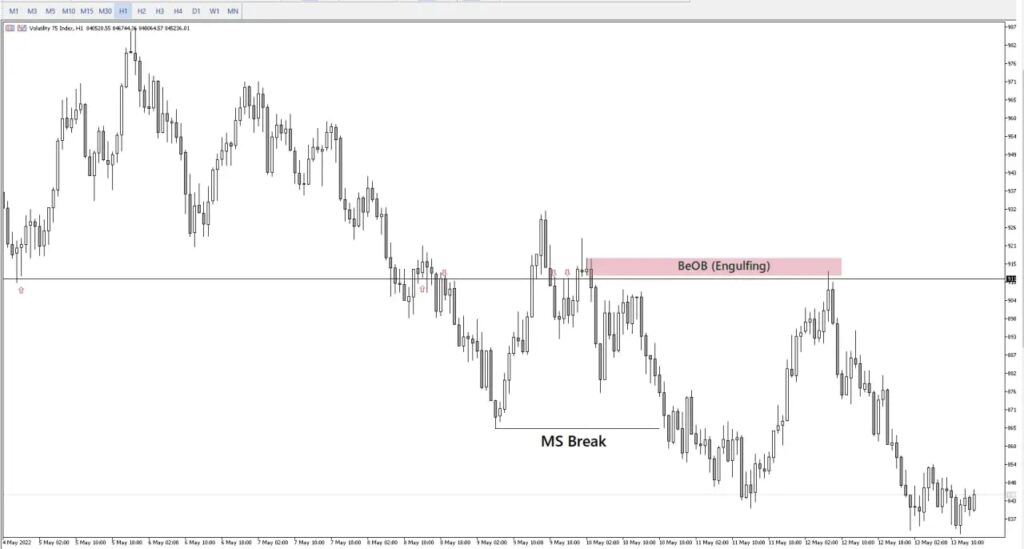
Assignment; Share in the comment section below the charts for BuOB of the example given above.
5. The order block order should be below EQL or above EQH.
Here, we wait for the manipulation of EQH or EQL.
For EQH, check for BeOB above EQH. The market will manipulate ( breakout) this EQH before
respecting your BeOB.
For EQL, check for BuOB below EQL. The Market will manipulate (breakout) these EQL
before respecting your BuOB.
This setup gives high probability odds if the EQH or EQL forms at the same level as the Flip Zone.

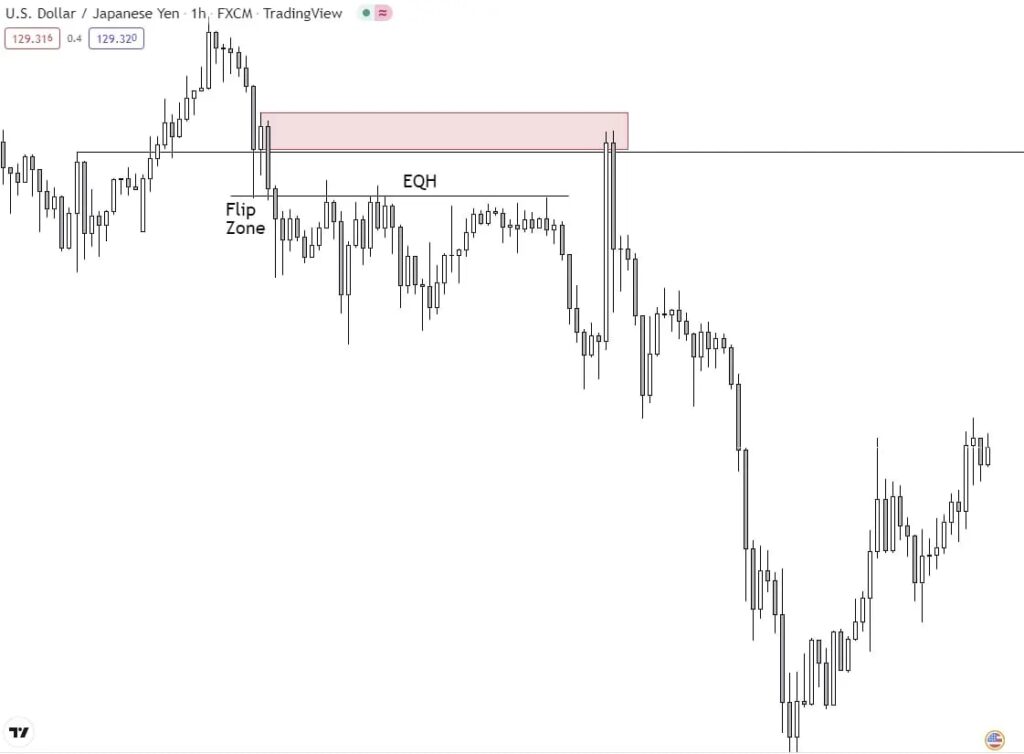
Assignment; Share in the comment section below the charts for BuOB of the example given above.
Putting Everything Together – Market Approach, SOP & Rules for a Complete Setup
You have realized that the above features might be somehow challenging to only depend on
them, so you need to combine 2 or 3 for you to have a high probability setup
Here, I will give you a hint of some of the rules I combine before I engage the market. The most
important thing is to monitor how price behaves in different timeframes.
Multi-Time Frame Analysis
Over-refining your analysis can also be tricky, as you might miss a good move or be thrown out
before the price goes in your anticipated direction, just because you are targeting the smallest
stop-loss possible.
However, we all have different styles of trading. Personally, I would rather have a large stop loss
on a high-probability setup because the chances of a price going my way has a high chance.
Therefore, doing a multi-timeframe analysis can help you spot a good setup before making your
decision.
Market Approach for Multi-Timeframe Analysis
1. The Past
Here, you have to check for confirmation from HTF POI such as;
- Supply Zones and Demand Zone
- Strong Resistant & Support
- Significant Support & Resistance Level
- Old High & Low
2. The Process
After the price reacts to your HTF POI, the price action is essential for another confirmation.
Here you want to see:
- Market Structure Break, followed by
- Flip Zone formation (if it happens, though)
3. The Approach
How price action approaches your OB is also an important aspect to consider.
To ride with the big boys, we only want to engage the market after the MM has done a manipulation.
Important questions to ask yourself here are:
- Has the price made EQH?
- Has Fake MS Break (signaling a sell or buy) happened after price testing the Flip Zone?
- Is the price approaching your OB while balancing their orders (Compression) or
- Is the price approaching your OB aggressively to fake buys or sells?
- Another price action signal you can check is whether the price is making 3D.
4. The Reaction
After the price reacts to your OB, you can get another entry (Confirmation Entry). However, this
hardly happens since your OB with such complete setups acts as High Liquidity Zones (HLZ).
So, prices tend to react at this point aggressively without turning back because the market maker
has accomplished his mission (Flip Zone + EQH/L Breakout).
Therefore, if any price action happens after your OB is respected, check for;
- SH + BMS + RTO formation
- Any other valid setups discussed in this article
Note: If Engulfing, DM, or Pin Bar OB forms at this point, it gives a High Probability of
CONFIRMATION ENTRY


Assignment; Share in the comment section below the charts for BuOB of the examples given above.
What Do You See??
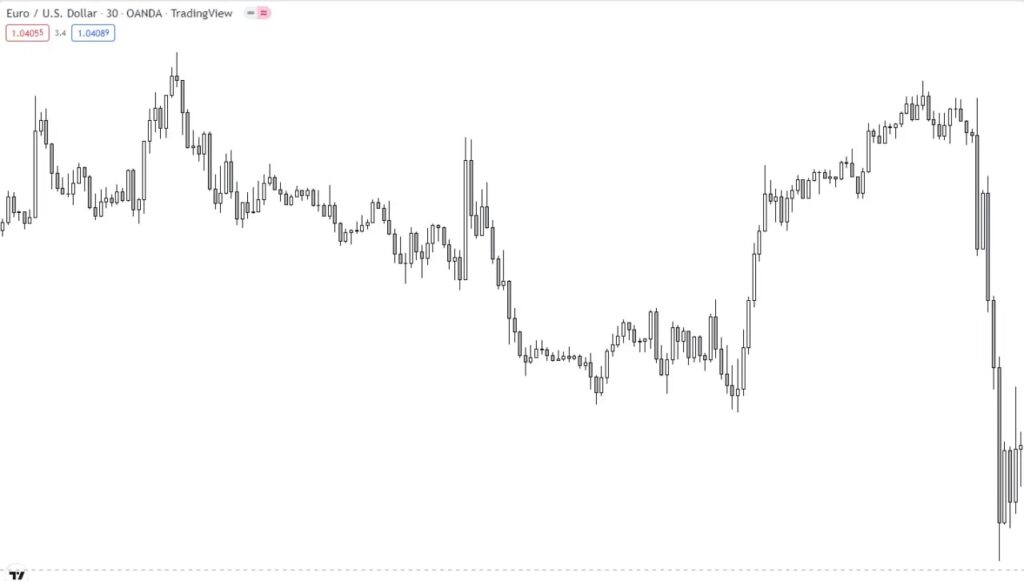
Study the chart below and mark up what you can see. Feel free to share your markup in the
the comment section below.
As a smart trader, your primary objective is to wait for your best setups to show up. Money is made by stalking the big boys, not being active, and forcing trades every time you see a sexy move.
Conclusion
You can use this method to trade any financial market, including VOLATILITY INDICES, CRASH/BOOM, JUMP INDICES, STEP INDICES, RANGE BREAK INDICES, NASDAQ, GOLD, BTCUSD, EURUSD, GBPUSD, and many more.
Sign up for a demo account and practice this strategy on Synthetic/Volatility Indices and Currencies/Gold/Nasdaq.

Recent Comments